Equipment recommendation to record videos for YouTube studio. From the most basic to something more professional.

We are going to see what we would need to set up a small video recording studio at home, especially aimed at a vlogger / youtuber who appears in the foreground, in front of the camera.
For the team we are going to try to recommend or give options from the simplest and cheapest to a semi-professional solution. We will divide it into sections: camera, sound, lighting and the studio itself.
Keep in mind that the final result (regardless of the content itself, editing, etc.) will depend on the entire set, that is, it is useless to record with a professional camera if we have lousy lighting or the audio is bad .
Browse the following specific section: the camera | the tripod | the sound | the lighting | the bottom
1.- The camera
You can start with any type of camera.
A current mid-range mobile already gives a more than decent image quality with good lighting.
In general, a video camera or a photo camera has better optics and above all provides more flexibility, you can get more out of it.
Basic requirements
That it records at least in Full HD (1080p) and that it can be mounted on a tripod (if you use a mobile you can find very cheap tripod adapters).
Desirable characteristics:
- Good focus and tracking system (eg face/eye detection to keep subject’s face in focus)
- The 180º tilting (selfie mode) or fully articulated screen can be useful when recording ourselves, to see the frame and if we are in focus (this can be a little more difficult from a distance but most cameras include a visual indicator of the focus point, a colored rectangle, or some such indicator)
- If the camera has an external microphone input, it simplifies our work a bit because we will have sound and video in the same file, already synchronized. But to record audio in the studio you have many possibilities .
Video camera or still camera?
Without going into technical details. A camera with a large sensor (1-inch or larger) offers more artistic possibilities and will perform better in certain situations.
Mid-range video cameras (camcorders) usually have small sensors. And the upper-middle-range ones are usually very expensive and only compensate for professional projects.
My recommendation would be a camera, with interchangeable lenses if possible (SLR or EVIL doesn’t matter).
As a second option I would choose a high-end compact camera with a 1-inch sensor.
As a third option, perhaps a mid-range camcorder.
And as an alternative option a mid-range mobile.
Compact camera, SLR, mirrorless…?
Although there are many other factors, perhaps one of the most important is that with interchangeable lens cameras we can use the optics that best suit what we need and that the larger the camera sensor, the more possibilities it will give us.
These factors will allow us to achieve blurred backgrounds, for example (the subject stands out from the background, which appears blurry, which gives the video much more prominence and a more attractive appearance) or they will give us more possibilities to record when there is not much light in the scene.
See here why SLRs / EVIL are so widely used for video .
Within interchangeable lens cameras you can find reflex cameras (they have an optical viewfinder) and mirrorless cameras (also known as EVIL or mirrorless) that have an electronic viewfinder or some models only the rear screen, without a viewfinder.
Choose the model that best suits your needs, budget, etc. It doesn’t matter if it’s SLR or mirrorless. Here you have more information: SLR vs EVIL / mirrorless camera .
And here you also have an updated list of recommended cameras for video and more technical information about each model.
2.- Tripod for the camera
It can be a tiny tripod to place on top of a table, but in general it is convenient to have a tripod that allows us to adjust the height and offers a very stable support for the camera .
If you are going to record in the studio, that is, in a very controlled environment where there will be no wind, no vibrations and the ground will be level, etc. You can choose a mid-range tripod, you don’t have to spend a lot of money.
You must bear in mind that the stability on the tripod also depends on the weight of the camera plus objective. The greater the weight, the more robust the tripod must be to provide stability and to prevent the camera from having a fatal accident.
If you are going to record outdoors, for example if you are going to go out into the countryside, mountains, etc. it is preferable to invest a little more, in a resistant tripod made of good materials, and light if possible. Look for a tripod with an aluminum or carbon fiber frame.
Medium-high range tripods are divided into two parts, the tripod itself (the legs) and the ball or head (the part that connects to the camera and allows movement). The heads of these tripods are purchased separately since each type of head has certain characteristics and uses.
For example, for video, heads with internal fluid are often used that allow very smooth camera movements.
3.- Sound
Sound quality is just as important (and in many cases more important) than video image quality.
If you can, avoid recording sound with the camera’s internal microphone . It would be the last resort because it is the option that will give us less quality.It is very important to somehow improve the acoustics of the room or venue where we are going to record. Poor acoustics can destroy sound quality and it doesn’t matter if we use the best microphone in the world. Take a look at the series on
how to improve the acoustics of a room or studio here .
Use whenever you can an external microphone or external recorder (you can even use a normal mobile as a sound recorder)
Take a look at this article on recording audio in a more professional way and this one on how to record quality sound for video or streaming in the studio .
As I mentioned before, to record sound with good quality in the studio there are many options.
One of them is to use a lapel microphone (also known as a lavalier or tie microphone). They are relatively cheap and easy to use.
To achieve the highest possible sound quality for your voice, the most suitable option would be an XLR microphone together with a sound interface connected to the computer.
Or a USB microphone , which would be the simplified version: the microphone itself already includes the sound interface and the necessary electronics.
4.- Lighting
Lighting is possibly one of the most important factors in achieving quality video (also applicable to photography).
You can have the best camera in the world, but in the end the camera captures the light of the scene… if the scene is poorly lit the result will be bad.
We are not just talking about the amount of light, but about using light to create a suitable environment for the scene to be recorded. Lighting a scene is a science, but it’s also an art.
But you don’t have to be obsessed either.
What we want to achieve initially is correct lighting, so that the image quality does not kill us.
We are going to see some lighting options for a small studio (for example, a room in our house) and a usual format with the interviewee (the vlogger himself, for example) in the foreground.
What we normally look for in these types of scenes:
- That there is enough light, so that the camera can work in its optimal range and that it can correctly capture the details and colors
- Get volume so that the person’s features are well represented
- Avoid harsh shadows, especially on the face
- Give prominence to the subject with respect to the background
The basic lighting scheme can be done with 3 light sources : main light , fill light and counter light ( backlight ) .
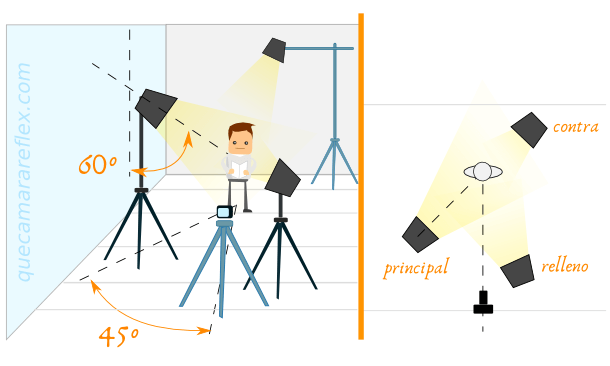
main light
As its name indicates, the main light is the one that provides the most light and serves as a reference for the others. It is usually placed at about 45º with respect to the camera-subject axis.
It is placed above the height of the head pointing to the face, at an angle of about 60º, so that the shadow of the nose is angled downwards.
You can play with the angles of inclination, for example, if the subject wears glasses to avoid reflections or to make the subject look as flattering as possible.
The main light sets the tone for the intensity of the other sources and sets the color temperature .
All light sources should have the same color temperature as the main source. It is not interesting to mix color temperatures (eg fluorescent light with tungsten lamps). But we can play with lights of different color temperatures or even with colored lights for the background.
All the lights should be on the softer side , including the main source, although this one can be a bit harsher.
A hard light is one that casts very pronounced shadows (a very dense shadow gradient).
A soft or diffuse light is one that generates very soft shadows (very soft gradient).
Hard lights come from point light sources, with little emission surface, for example a light bulb, a flashlight, a direct flash, direct sunlight…
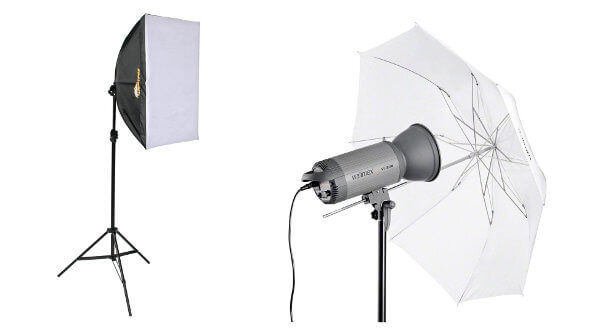
Diffusers are used to soften a light .
For video, perhaps the most comfortable for the person in front of the spotlights are softboxes or diffusing umbrellas, which are nothing more than a translucent white surface placed in front of the light source.
fill light
Continuing with the basic lighting scheme, the second source would be the fill light .
The fill light is placed on the opposite side with respect to the main light and the camera-subject axis.
That is, if the main light illuminates the left part of the face, the fill light would illuminate the right part. The angle of incidence would be quite flat with respect to the camera so as not to generate new shadows (the double shadow effect usually looks bad on the face).
The idea of the fill light is to soften the shadows cast by the main light but play up those shadows to maintain a sense of volume on the face. The fill light has to be soft and less intense than the main light (we can play with the intensity or with the distance to the scene).
It doesn’t have to be a spotlight, it can be a white reflector (a white surface large enough that we can easily change its angle).
There are very cheap portable reflectors. We just have to find some way to hold them so they stay at the angle we need.
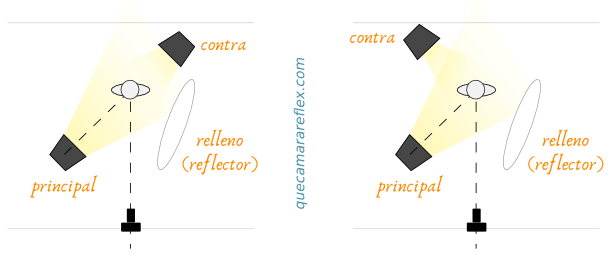
back light
The third source of light is the light against or against the light (hair light in English).
This light is placed behind the subject, high above their head and aimed at the top of their hair and shoulders (from behind).
The objective of this light is to create volume, define the profile and above all to separate the subject from the background.
We will regulate the height and intensity depending on the subject: if it has a lot of hair, little hair or none… and the color of the hair (the backlight will be less noticeable in dark hair)
The counter light can be placed on the opposite side of the main light or on the same side.
Backlight
This light source is optional, it will depend on the type of background we have in the studio.
The idea would be to try to achieve a pleasant environment but that does not represent a distraction with respect to the protagonist.
For example, if we have a white wall in the background, it will surely appear in the image with a grayish tone that does not add anything.
We can illuminate that wall from below, for example, with some type of light, white or colored, to create a gradient and give that pleasant atmosphere to the eye.
In general it will be a very soft and subtle lighting. As it is located behind the main scene, it should not influence the lighting scheme, but care must be taken that these colors do not creep in (in case we use color) and can create some color cast that affects the tone of the scene. expensive.
What do I need then?
The best light is natural light, you can try to organize your study to use a large window as the main light and a white reflector for the fill light.
But keep in mind that this is not always possible (due to the geometry of the study) and that natural light makes us very dependent on the time and type of day (cloudy, sunny, the passage of clouds produces changes in intensity…)
If you can make a small investment, look for a led panel for the main light.
LED panels allow you to regulate the light intensity, they do not generate heat, some allow you to change the color temperature, they consume very little…
You can find panels of 300, 600 and 900 leds at a reasonable price. With a panel of 600 leds it should be enough for a studio in a normal size room.
Keep in mind that some battery-powered led panels do not include a power supply, but normally they do include a connector (that is, you have to buy the power supply separately).
If the panel does not have a color temperature option, always choose 5500K, which is the natural light temperature, in this way you can use the external light itself (when available) as the main source or as filler. And you also have to see if the panel includes or not a tripod, supports, etc. In case you have to buy it separately.
A cheaper option is light boxes that use energy-saving fluorescent bulbs.
Some softbox kits already include a tripod, diffuser, etc. These boxes usually have a base for several bulbs.
If you are only going to use the lighting in your studio, you can even make the light boxes at home, there are many tutorials on the internet, in any case the price of the structure and the support for the light box is usually low, the most expensive are probably the bulbs.
You can buy the bulbs separately, 5500K (color temperature), and with a minimum power of 40-50W. They should be specific bulbs for studio/photography lighting (high CRI) for best results.
Professional lighting tripods and supports are more expensive because they are designed for intensive use, taking into account assembly, disassembly, transport and working conditions. The tripods that come in softbox kits and cheaper lighting tripods are usually quite flimsy, but if you are only going to use them in the studio they can be an acceptable option.
It is not worth buying halogen bulbs or bulbs based on incandescent lamps: they consume a lot and generate a lot of heat, to the point of being dangerous.
You can look for different combinations to create those three light sources of the basic lighting scheme:
- A large led panel as the main one and two smaller led panels as fill and backlight (since we can adjust their intensity at will)
- A large LED panel as the main source, plus a fill reflector and a smaller LED spotlight as backlight.
- Two light boxes: one main and one for backlight, using a reflector for fill
- Three light boxes. We can adjust the intensity for fill and backlight by unscrewing bulbs or separating the source
- …
There are small led torches that attach to the camera’s hot shoe, perfect for shooting video outdoors. We can take advantage of these torches, for example, for backlighting or for filling.
Light quality – CRI
Sunlight and light from incandescent materials (tungsten lamps, typical old light bulbs or halogen lamps) have the property of emitting at all wavelengths.
To put it simply: they emit all possible colors .
When white light falls on objects, they absorb some wavelengths and reflect others. Each object has a characteristic hue based on the colors it absorbs and reflects.
Fluorescent lamps and LEDs , due to the physical processes they use to generate white light, generate a somewhat different spectrum of radiation. Simplifying a lot: they do not emit all possible colors within the visible spectrum.
Those gaps in the emission spectrum slightly affect the color of the objects.
Normally there are color components that should not be there (by default or by excess). Depending on the emission spectrum, it can be noticed, for example, in the skin tone of people or when photographing products that have to show the exact color (brand corporate colors, etc.) or slightly more muted colors can be generated. .
The CRI (Color Rendering Index) is a value that measures the quality of light from a source based on how that light can faithfully generate the range of colors in a scene, always from the point of view of human vision.
The CRI scale runs from 0 to 100, with 100 being the ideal light source (sunlight or tungsten lamp).
In professional photography it is considered ‘perfect’ light from CRI 90 .
Below CRI 60 is considered low quality light for photography (and video).
The CRI is not a perfect indicator , for example it does not work very well with LED sources and it does not take into account that the electronic sensor works differently from the human eye, but it gives us an idea of how good (or bad) a certain source is. of light.
Low consumption lamps (CFL in English – compact fluorescent lamp) and LED lamps that we find in all stores, for domestic use, store lighting, etc. they are designed to offer a certain light output and a certain color temperature, but their CRI is usually low and can vary greatly between different makes and models (with CRIs from 20 to 80)
That is why there are specific models for photography, with higher CRI , above 80 and . These models, as a general rule, tend to be more expensive, but it is worth it because this way we will achieve colors that are more faithful to reality and more intense. And if you record people, the skin tone will be more realistic.
If your budget is very tight, you can try LED or ‘normal’ low consumption lamps (for domestic use). The problem is that each brand and each model can offer quite different results.
5.- Background / recording set
We will try to ensure that the scene is focused on the subject, not on the background.
Try to separate the subject from the background as much as you physically can.
The backlight helps to give volume and separate the subject from the background.
We can also place an additional light source ( backlight ) illuminating the background, for example from below or from the side, to give a sense of depth.
You can use colored light, soft pastel colors for example and with a soft intensity.
You can also place a point of light in the background: a low-intensity LED, a candle, an LED strip… If your camera allows you to blur the background, you will get those points to become diffuse circles that look great to give atmosphere .
You can use part of the decoration of your studio as a background, for example if you record in a room at home or in the living room, or if you have a dedicated studio.
But please check that everything is minimally tidy, clean and presentable . It gives a very bad image to see the mess in your room in the background, boxes in the middle, dirt…
Backdrops for photography can be purchased for little money.
Or we can simply use a white wall area (or whatever color it is) as a background and use a small ambient light next to the wall to break the uniformity a bit.
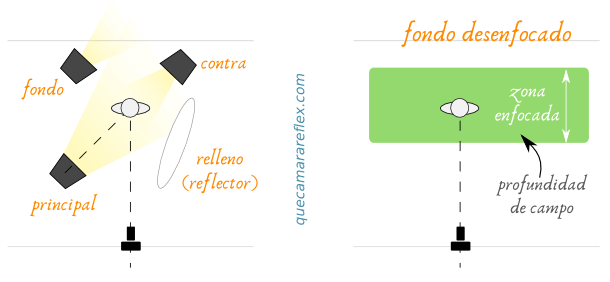
Something that is very good is the selective blurring of the background (the subject is in focus while the background is out of focus, the type of blur or its quality is called bokeh in photography).
What we need to get a blurred background :
- We will try to place the subject as far from the background as possible
- We will use a telephoto lens, which gives us an equivalent focal length above 50mm to put an indicative figure
- We will try to use a large aperture (f/2.8 – 1.8 if possible).
- If your camera does not have interchangeable lenses or you only have the kit lens, try to use the largest focal length (highest zoom) that allows you to frame the scene.
- Bring the camera closer to the subject as far as the frame you are looking for allows
Keep in mind that what we are looking for is to reduce the depth of field, to reduce the area that is in focus in front of and behind the person in front of the camera.
If you go too far and reduce the depth of field a lot, any movement of the subject will take it out of focus and the cure will be worse than the disease.
That is why it is preferable to move the background as far as possible and play with a depth of field that gives us some flexibility.
In cinema, marks are made (for example on the ground) so that the actor knows how far he can move forwards and backwards during a scene.
If you have your camera set to autofocus mode and have a very shallow depth of field it is possible that the camera is constantly looking for the perfect focus point and what it gets is an unpleasant effect of constant blur.
Nor should we be obsessed with the blur, it is not worth it if to achieve it we have to use such a forced framing that it spoils the final result.